Vue3 Composition API와 기초 문법 다뤄보기(2)

Vue3 Composition API와 기초 문법 다뤄보기(1) 에 이어서 나머지 문법을을 다뤄보고자 한다.
6. 조건부 렌더링
v-if는 엘리먼트를 조건부로 렌더링 하기 위해 사용된다.
<script setup>
import { ref } from 'vue'

const awesome = ref(true)

function toggle() {
 awesome.value=!awesome.value
 //토글 작업 시 사용코드 이다.
}
</script>

<template>
  <button @click="toggle">토글 버튼</button>
  <h1 v-if="awesome">Vue는 굉장해! 엄청나!</h1>
  <h1 v-else>오 안돼 😢</h1>
</template>
v-if와 v-else가 있는 태그는 위 아래로 붙어 있어야 동작한다.
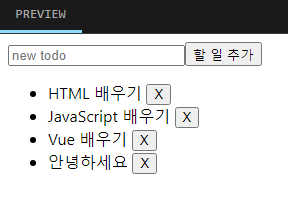
7. 리스트 렌더링
v-for을 사용해서 자료 배열을 렌더링 할 수 있다.
<ul>
  <li v-for="todo in todos" :key="todo.id">
    {{todo.text}}
  </li>
</ul>
v-for 사용시에는 고유의 key값을 꼭 넣어줘야한다.
key를 사용하면 vue가 각 li를 정확하게 이동시켜 배열에서 해당 객체의 위치와 일치하게 할 수 있다.
<script setup>
import { ref } from 'vue'

// 각 할 일에 고유한 ID 부여
let id = 0

const newTodo = ref('')
const todos = ref([
  { id: id++, text: 'HTML 배우기' },
  { id: id++, text: 'JavaScript 배우기' },
  { id: id++, text: 'Vue 배우기' }
])

function addTodo() {
  todos.value.push({id:id++, text:newTodo.value})
  //자료 배열에서 변경 메서드를 호출한다.
  newTodo.value = ''
}

function removeTodo(todo) {
  todos.value = todos.value.filter((t) => t !== todo)
  //배열을 새 배열로 교체한다.
 }
</script>

<template>
  <form @submit.prevent="addTodo">
    <input v-model="newTodo" required placeholder="new todo">
    <button>할 일 추가</button>
  </form>
  <ul>
    <li v-for="todo in todos" :key="todo.id">
      {{ todo.text }}
      <button @click="removeTodo(todo)">X</button>
    </li>
  </ul>
</template>
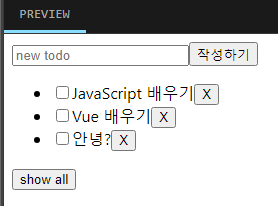
8. 계산된 속성, computed
computed는 반응 데이터 소스를 기반으로 .value를 계산하는 계산된 ref를 만들 수 있다.
계산된 속성은 의존성이 변경되면 자동으로 업데이트한다.
7.리스트 렌더링 예제 코드에 이어서 계산된 속성 filterTodos를 추가하고,
완료된 항목 숨기기 버튼을 누르면 완료한 할 일은 즉시 숨겨져야 한다.
<script setup>
import { ref, computed } from 'vue'

let id = 0 //id 값 0 부터 시작

const newTodo = ref('') //반응성 추가
const hideCompleted = ref(false) //완료 숨김 초깃값 false

const todos = ref([
  { id: id++, text: 'HTML 배우기', done :true },
  { id: id++, text: 'JavaScript 배우기', done :false },
  { id: id++, text: 'Vue 배우기', done :false }
]) // todos 리스트업

const filteredTodos = computed(() => {
  return hideCompleted.value
  ? todos.value.filter((t) => !t.done)
  : todos.value
})
//(값이 true일 때는 todos배열에서 done 속성이 false인 객체들만 필터링 해서 반환,
//false일 때는 모든 작업들 반환)
//여기서 (t)는 todos의 목록들을 나타낸다.
//!t.done은 해당 할 일 항목이 완료되지 않았다는 것을 의미 false
//filter((t) => !t.done)는 완료여부 확인체크용

function addTodo() {
  todos.value.push({id:id++, text:newTodo.value, done:false})
  newTodo.value = ''
}

function removeTodo(todo) {
  todos.value = todos.value.filter((t) => t !== todo)
}
</script>

<template>
  <form @submit.prevent="addTodo">
    <input v-model="newTodo" required placeholder="new todo">
    <button>작성하기</button>
  </form>
  <ul>
    <li v-for="todo in filteredTodos" :key="todo.id">
      <input type="checkbox" v-model="todo.done">
      <span :class="{ done : todo.done }">{{todo.text}}</span>
      <button @click="removeTodo(todo)">X</button>
    </li>
  </ul>
  <button @click="hideCompleted = !hideCompleted">
    {{ hideCompleted ? 'show all' : 'hide completed' }}
  </button>

</template>

<style>
 .done {
   text-decoration : line-through;
 }
</style>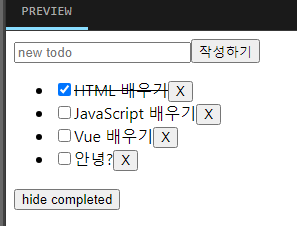
9. 생명주기와 참조
DOM을 수동으로 작업해야 하는 경우가 있다. 이럴땐 ref 를 사용해주면 된다.
참조에 접근하려면 이름이 일치하는 ref를 선언해주면 된다.
ref는 null값으로 초기화한다. script setuo 실행 시 해당 엘리먼트가 아직 존재하지 않기 때문이다.
템플릿 참조는 컴포넌트가 마운트(onMounted) 된 후에만 접근할 수 있다.
<script setup>
import { ref, onMounted } from 'vue'

const pElementRef = ref(null)

onMounted(() => {
  pElementRef.value.textContent= '마운트 되었어요';
 }
)
</script>

<template>
  <p ref="pElementRef">안녕</p>
</template>
10. watch
watch()는 말 그대로 지켜보다가 ref가 실시간으로 변하는 것을 감지 할 수 있다.
computed와 유사하지만 부가적인 동작에 더 많이 사용된다.
무언가를 초기화 하거나 특정 데이터가 변경되거나 구성 요소가
더 이상 사용되지 않을 때 정리해야 하는 경우 watch를 사용한다.
computed가 주로 동기로 값을 리턴한다면 watch는 비동기로 처리되고 값을 리턴하지 않는다.
watch :{
  함수명(새로운 값, 이전 값){
  //...
  }
}
아래 예시코드1)는 foo의 값이 변경 될 때 마다 newValue값을 활용할 수 있다.
<script setup>
  import {ref, watch} from 'vue'
  const foo = ref('')

  watch(foo, (newValue) => {
    consol.log(`foo의 값 : ${newValue}`);
  })

</script>
예시코드2)
<template>
  <div>
    <p>Counter:{{counter}}</p>
    <button @click="increment">카운트 버튼</button>
  </div>
</template>

<script setup>
  import {ref, watch} from 'vue';

  const counter = ref(0);

  watch(counter, (newValue, oldValue) => {
    console.log('${oldValue}에서부터 ${newValue} 카운터 변경');
  })
  <!--
      watch에서 첫번째 매개변수는 변경 사항을 감시하려는 값이나 표현식이고,
      두번째 매개변수는 감시된 값이 변경될 때 실행되는 콜백함수 이다.
      -->

  const increment = () => {
    counter.value++;
  }
</script>
기본 틀은 다음과 같다.
watch(watchExpression, callback, options?)
-watchExpression : 반응형 개체에 대한 참조나 감시할 값을 반환하는 함수가 들어간다. 변경사항을 추적하고 변경 시 콜백을 트리거한다.
- callback : 관찰한 표현이 바뀔 때 마다 호출되는 함수이다. 위 예시코드2) 에서 newValue, oldValue 라는 두개의 인수를 받는다. 이 함수 내에서 값이 변경 될 때 수행할 작업을 정의할 수 있다.
- options : 설정 시 콜백을 주는 즉시 실행해야 하는지 여부를 나타내는 감시자에 대한 추가옵션이 포함되어 있다.
11. 컴포넌트
단일컴포넌트가 아닌 중첩된 컴포넌트를 활용할 수 있다.
상위 컴포넌트는 다른 컴포넌트를 템플릿의 하위 컴포넌트로 랜더링 할 수 있다.
하위컴포넌트를 가져오는 기본적인 구조는 아래와 같다.
<!-------------App.vue------------------>
<script setup>
  import ChildComp from './ChildComp.vue'
</script>

<template>
  <ChildComp />
</template>
<!-------------App.vue------------------>

<!------------ChildComp.vue-------------->
<template>
  <h1>자식 컴포넌트 입니다.</h1>
</template>
<!------------ChildComp.vue-------------->
글이 길어져서 추가 문법(props, emit 등)에 대한 내용은 3편에서 다뤄보도록 하겠다.